Windows Live Writer : Why You Should Switch

I started my personal blog Just Another Pixel in 2008. Back then, I was only using Blogger’s post editor. Though I’ve gotten used to the whole interface, it was just too limited and small for me to compose my blog posts in. Thank goodness I found a better solution – Windows Live Writer (WLW). I never looked back.

If you haven’t heard of Windows Live Writer yet, it is an offline / desktop blog post editor developed by Microsoft Corp.. It’s user-friendly and can handle almost everything a blogger can throw at it. If you’re not yet using this, I’m hoping my series of posts about this amazing blog post editor will convince you. 🙂
KEY FEATURES
Windows Live Writer can be used to compose and edit blog posts for Windows Live Spaces, SharePoint, Blogger, WordPress, Typepad, LiveJournal, Telligent Community, PBlogs.gr, JournalHome, the MetaWeblog API, the Movable Type API, Blogengine, Squarespace and those that support RSD (Really Simple Discoverability)*.
I use it for all my WordPress and Blogger blogs. And, to be quite honest, Windows Live Writer has made me want to blog more because of all its features that makes it quick and easy to compose a post and publish it to your blog/s.
Here are the key features of Windows Live Writer:
Blog Theme Integration
When you add your blog account, it will import the theme you’re currently using. This makes it look like you’re writing your post live directly on your blog so you’d already have a preview of pretty much how it’ll look like when published. Here’s a screenshot of a blog post I was writing for Certified Foodies.
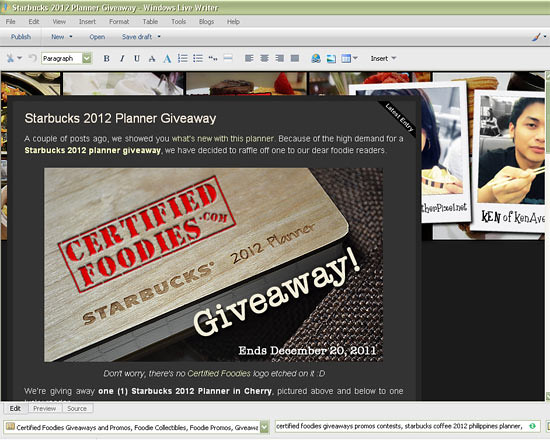
Though the header is not positioned properly, you can see that the colors of our post background, the font, and almost all the elements of our blog theme are already there.
Switch Blogs With One Click
You can add as many blogs as you want. And switching back and forth is made easy – with one click of the mouse. You’d see the current blog you’re writing for on the upper right. Click on it and it will give you the list of your blogs.

Insert and Edit Images for your Blog Posts
With Windows Live Writer, it’s easier to insert images into your blog posts. You can even drag and drop if you’re hosting them on your own server (I use Flickr so most of the options are not available – read on for more details). The program will take care of the uploading for you.

Above is a screenshot of a photo I inserted into a new blog post. As you can see on the right, there are also numerous options available to you to adjust how your photos look on your post. You can add a drop shadow, apply a polaroid or photo paper frame, or even make the corners rounded.
Under the Advanced tab, you can adjust the image size, rotate the image…

…adjust the brightness and contrast…

…and crop your photo right there. No need for an external image editor.

You can even tilt your photos! How cool is that?! 🙂

Another noteworthy feature is you can add watermarks to your images:

On the Effects tab, you’d see other adjustment options like Sepia, Color Pop, Sharpen and Gaussian Blur. You can add or remove numerous filters to get the effect you want.

Now, if you want to keep all these settings for next time so you won’t have to do it repeatedly, adjust all the settings you need and then click on the “Save settings as default”.

Note that doing this will affect ALL images you insert into your post that are hosted locally on your blog’s server.
Important Note: If you’re inserting images from third party image hosts, the above image adjustment options will NOT be available to you.
Edit Publish Date, Categories, Tags, Slug, etc.
If you’re using Blogger as your platform, you only have options to add and edit categories and adjust the publish date. But, for WordPress users, we’ve got more settings we can adjust right in Windows Live Writer.

You can edit the slug or permalink address of your blog post on WordPress. You can even turn off comments, pings or even set a password.

You can also change the author or who wrote the article / post directly in WLW.

Preview your Blog Post Before It’s Published
This is extremely useful for Blogger users. You can see a preview of how your post would look with all your current theme settings.

Take note, though, that the layout of your blog may not appear as it should be because of the limited or narrow space of the Windows Live Writer window.
Plugins Galore!
There are a wide variety of WLW plugins available that you can use. I particularly use the following:
- Flickr4Writer – For inserting photos from Flickr. I use this along with Flickr Uploader.
- Paste Code – For inserting codes without having to switch to Source view.
You can find more plugins at these websites:
- Windows Live Writer Plug-ins – straight from the makers of this program.
- WLW Plugins – a ton more plug-ins. 🙂
Edit and Save Your Post Drafts Locally
Windows Live Writer gives you options on how you want to save your posts:

You can save your drafts locally, to your computer’s hard drive. Or you can opt to post / upload the draft to your blog and retrieve it anytime you need to finish or work on it.
Once you’re happy with your blog post, click the Publish button and wait for WLW to finish uploading everything. 🙂

Various Writing / Editing Tools
Of course, there are the usual character formatting and alignment options.

But, you also have spell checker and word count tools available for you in Windows Live Writer. Very useful for those who need to write within a target amount of words. 🙂
MY FAVORITE: Auto-Linking!
Windows Live Writer makes it easier for us to link to the usual sites, blogs or internal blog posts that we link to. You can save your links so next time you use your chosen keywords, they’ll automatically be changed to links.

How to use this? Just highlight the keywords, press CTRL+K or right-click and choose Hyperlink…. A popup window (pictured above) will be displayed. Enter all the necessary information and check “Automatically link to this text”. WLW will even save the setting if you changed the link to noFollow (under Rel:).
IMPORTANT NOTE: Auto-linking only works ONCE within your post. BUT, if you select the same keywords and try to enter a link for it, WLW will automatically provide all the details. Anyway, you don’t need to link to the same site using the same keywords in one article. That’s another SEO tip. 🙂
Internal linking is one of the most important Search Engine Optimization (SEO) techniques we can all practice. The auto-linking feature of WLW makes me perform this SEO habit more efficiently while I multi-task to accomplish all my other tasks online and offline (like designing and printing invites and name plates at my shop, etc). 🙂
———————————————————————————————–
Without a doubt, for me, Windows Live Writer makes composing my blog posts easier and more fun. If you’re already convinced and you want to try it, here are the download links. Now, head on over to my next post –> How to setup Windows Live Writer!
DOWNLOAD NOW!
I hope they’ll continue updating Windows Live Writer, like adding better <div> control. But, nonetheless, I LOVE IT!! 🙂


